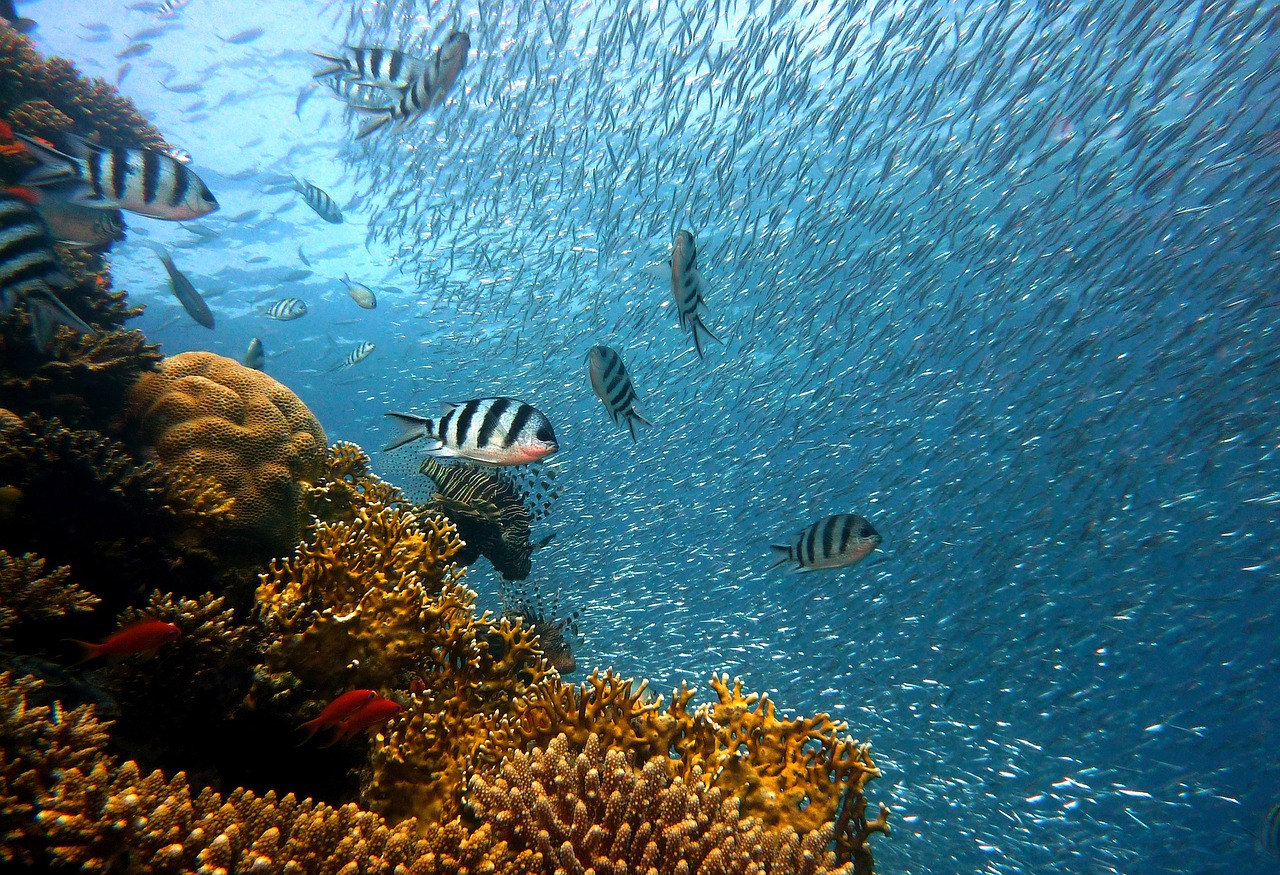
Filming underwater with an action camera can be an exhilarating experience, allowing you to capture the beauty of marine life and stunning underwater landscapes. However, to achieve the best results, it is essential to understand the optimal settings, the necessary accessories, and various techniques that can enhance your underwater videography experience. This article will guide you through each aspect to ensure you get the most out of your underwater filming adventures.
When choosing an action camera for underwater filming, durability and waterproof capabilities are paramount. Popular options include the GoPro HERO series and DJI Osmo Action, both renowned for their exceptional performance in aquatic environments. These cameras are designed to withstand the rigors of underwater use, providing high-quality footage even at significant depths.
Proper setup is vital for capturing stunning underwater footage. Here are some key settings to consider:
- Resolution: Opt for 4K for detailed footage, but ensure your storage can accommodate larger files.
- Frame Rate: A higher frame rate like 60fps is ideal for fast-moving subjects, while 30fps is sufficient for slower scenes.
- White Balance: Adjusting this setting is crucial to restore natural colors distorted by water.
Underwater environments can significantly distort colors due to water absorption. Adjusting your camera’s white balance settings is essential for ensuring that your footage appears vibrant and true to life. This adjustment will help in maintaining the natural hues of the underwater world.
Using the right accessories can elevate your underwater filming experience. Key items include:
- Waterproof Housings: Protect your camera from water damage. Choose housings rated for the depths you plan to explore.
- Filters: Red filters are excellent for deeper dives, while polarizing filters can reduce glare and enhance clarity.
- Lighting: Underwater lights can improve visibility and color accuracy, especially in deeper waters.
Regular maintenance is essential for the longevity of your action camera. After each use, rinse the camera and accessories with fresh water to remove salt and sand. Ensure that seals and gaskets are clean and free from debris to prevent leaks.
Employing specific techniques can significantly enhance your underwater footage. Consider the following:
- Use Natural Light: Filming during mid-day when sunlight penetrates the water can enhance visibility and color vibrancy.
- Stabilization Methods: Techniques like using a floaty grip or a gimbal can help reduce shaky footage, resulting in smoother videos.
Editing is crucial for refining your underwater videos. Utilize software like Adobe Premiere Pro or Final Cut Pro for color correction, trimming, and adding effects. This step can significantly enhance the overall quality of your footage, making it more engaging for viewers.
By following these tips and utilizing the right settings and accessories, you can create stunning underwater videos that capture the essence of the aquatic world. Whether you are a beginner or an experienced videographer, these insights will help you make the most of your underwater filming adventures.
 1")
What Are the Best Action Cameras for Underwater Filming?
When it comes to underwater filming, choosing the right action camera is essential for capturing stunning visuals. The underwater environment presents unique challenges, such as light distortion and color loss, making it crucial to select a camera that excels in these conditions. Among the most popular choices are the GoPro HERO series and DJI Osmo Action, both renowned for their durability and waterproof capabilities.
The GoPro HERO series is a standout in the action camera market, offering a range of models suited for various underwater adventures. With features like 4K video recording, HyperSmooth stabilization, and a robust waterproof design, these cameras are built to endure the rigors of underwater exploration. The HERO10 Black, for instance, boasts an impressive frame rate and advanced low-light performance, making it ideal for capturing vibrant underwater scenes.
On the other hand, the DJI Osmo Action is another excellent option, known for its dual screens and RockSteady stabilization technology. This camera allows for seamless transitions between different shooting angles, making it versatile for both underwater and surface filming. Its waterproof casing can withstand depths of up to 11 meters (36 feet) without additional housing, making it user-friendly for divers and snorkelers alike.
When selecting an action camera for underwater filming, consider the following factors:
- Water Resistance: Ensure the camera is rated for the depth you plan to dive. Most action cameras are designed for shallow water, but some models can handle deeper dives.
- Image Quality: Look for cameras that offer high-resolution video capabilities, such as 4K, to capture detailed footage.
- Stabilization Features: Cameras with built-in stabilization technology help reduce shaky footage, crucial for underwater filming.
- Battery Life: Extended battery life is essential for long underwater sessions, so choose models known for their endurance.
Another notable option is the Insta360 ONE R, which features a modular design allowing for interchangeable lenses. This flexibility enables users to switch between 360-degree filming and standard action shots, providing creative versatility. Its waterproof housing can handle depths of up to 5 meters (16 feet), making it a suitable choice for shallow dives.
Ultimately, the best action camera for underwater filming depends on your specific needs and filming style. Whether you prioritize durability, image quality, or unique features, there is a camera that can meet your requirements. Investing in a reliable action camera can significantly enhance your underwater filming experience, allowing you to capture breathtaking moments beneath the waves.
 2")
How to Set Up Your Action Camera for Underwater Filming?
Setting up your action camera for underwater filming is an essential step that can make or break the quality of your footage. With the right adjustments, you can ensure that your videos are not only visually stunning but also rich in detail and color. Below, we delve into the key settings and techniques that will help you achieve exceptional underwater videography.
To capture breathtaking underwater scenes, it is crucial to adjust your camera settings before diving in. Here are some important parameters to consider:
- Resolution: Opt for high resolutions, such as 4K, to capture intricate details. While this requires more storage space, the clarity and quality of the footage can be significantly enhanced.
- Frame Rate: Selecting the right frame rate is vital. A frame rate of 60fps is ideal for fast-moving subjects, ensuring smooth motion. For slower scenes, 30fps is generally sufficient.
- White Balance: Underwater environments can alter color perception. Adjusting the white balance helps to restore natural colors, making your footage appear vibrant and true to life.
Underwater lighting can be tricky due to the absorption of colors by water. Here are some tips for effective lighting:
- Natural Light: Filming during the day when sunlight penetrates the surface can enhance visibility and color vibrancy. Midday is often the best time for this.
- External Lights: Consider using underwater lights to illuminate darker areas. These can drastically improve visibility and color accuracy, especially in deeper water.
Accessories play a significant role in enhancing your underwater filming experience. Here are some essentials:
- Waterproof Housing: A reliable waterproof housing is necessary for protecting your camera. Ensure it is rated for the depths you plan to explore and allows easy access to controls.
- Filters: Using color correction filters can help counteract color loss due to water absorption. Red filters are particularly effective for deeper dives, while polarizing filters can reduce glare.
In addition to setting up your camera, employing specific techniques can greatly improve your underwater footage:
- Stabilization: To avoid shaky footage, consider using a floaty grip or a gimbal. These tools help maintain a steady shot, resulting in smoother videos.
- Maintain a Steady Hand: Focus on keeping your movements slow and controlled. Quick movements can lead to blurry footage, so practice steadying your hand as you film.
By taking the time to properly set up your action camera and understanding the nuances of underwater filming, you can significantly enhance the quality of your videos. Whether you are capturing marine life or exploring underwater landscapes, these tips will help ensure your footage is both stunning and memorable.
What Resolution Should You Use for Underwater Videos?
When it comes to underwater videography, selecting the right resolution is a critical decision that can greatly influence the quality of your footage. Higher resolutions, such as 4K, offer an impressive level of detail, allowing you to capture the vibrant colors and intricate textures of underwater life. However, this increased detail comes at a cost—higher resolutions require significantly more storage space and can demand more processing power during editing.
To determine the optimal resolution for your underwater videos, consider the following factors:
- Editing Needs: If you plan to edit your footage extensively, a higher resolution like 4K provides greater flexibility. It allows you to crop and zoom without sacrificing image quality, making it easier to create dynamic shots.
- Device Capabilities: Ensure that your action camera and editing software can handle the resolution you choose. Not all devices can efficiently process 4K footage, which may lead to lagging or freezing during playback.
- Storage Availability: Higher resolutions consume more storage space. Be mindful of your storage capacity and consider investing in high-capacity memory cards if you opt for 4K. Additionally, keep in mind that longer recording times will require even more space.
- Intended Use: Think about how you plan to share your videos. If you’re uploading to platforms like YouTube or Vimeo, 4K may be advantageous. However, for casual sharing on social media, 1080p might suffice.
In many cases, shooting at 1080p can strike a balance between quality and practicality. This resolution offers excellent clarity while being less demanding on storage and processing capabilities. For most underwater adventures, 1080p is often more than adequate.
Another important aspect to consider is the frame rate in conjunction with resolution. While 4K at 30fps is common, you might want to opt for 60fps if you’re capturing fast-moving subjects, such as fish or divers. This higher frame rate ensures smoother motion and enhances the overall viewing experience.
Ultimately, the choice of resolution will depend on your specific needs and circumstances. By weighing the advantages and disadvantages of each option, you can make an informed decision that will enhance your underwater filming experience. Remember, the goal is to capture stunning visuals that reflect the beauty and wonder of the underwater world, so choose a resolution that aligns with your creative vision and technical capabilities.
As you plan your underwater shoots, keep these considerations in mind to ensure you achieve the best possible results. Whether you opt for the detail-rich experience of 4K or the more manageable 1080p, understanding the implications of your choice will lead to more successful and enjoyable underwater videography.
How Does Frame Rate Affect Underwater Filming?
When it comes to underwater videography, one of the most critical aspects to consider is the frame rate. The frame rate, measured in frames per second (fps), significantly influences the overall quality and smoothness of your footage. Understanding how frame rate affects your underwater filming can help you make informed decisions to enhance your videos.
Frame rate refers to the number of individual frames or images that are captured in one second of video. A higher frame rate means more frames are recorded, resulting in smoother motion and improved clarity, especially for fast-moving subjects. Conversely, a lower frame rate can lead to choppy footage, which may detract from the viewing experience.
- 60fps: Ideal for capturing fast-moving subjects such as fish swimming or divers in motion. This frame rate provides a fluid look, making action sequences appear more dynamic.
- 30fps: Suitable for slower scenes, such as observing coral reefs or marine life at rest. While it may not capture fast movement as effectively, it is often sufficient for general underwater exploration.
- 24fps: This cinematic frame rate can be used for a more artistic approach, giving your footage a film-like quality. However, it may not be the best choice for capturing rapid movements.
Underwater environments can be challenging due to varying light conditions and color absorption. A higher frame rate can help mitigate some of these challenges by allowing for better light capture. When filming at 60fps, your camera can gather more light, which is particularly beneficial in deeper waters where sunlight diminishes quickly.
Another aspect to consider is how frame rate interacts with stabilization techniques. Higher frame rates can help achieve smoother footage, especially when combined with stabilization tools like gimbals or floaty grips. This combination can significantly enhance the quality of your underwater videos, making them more visually appealing.
When deciding on the appropriate frame rate for your underwater filming, consider the following:
- Your subject matter: Fast-moving subjects may require higher frame rates.
- The desired aesthetic: Think about whether you want a smooth or cinematic look.
- Storage and editing capabilities: Higher frame rates consume more storage and may require more processing power during editing.
In summary, understanding the impact of frame rate on underwater filming is essential for creating stunning videos. By carefully selecting the right frame rate based on your subject and desired outcome, you can significantly enhance the quality of your footage. Whether you choose 60fps for fast action or 30fps for serene underwater scenes, the right settings will make all the difference in capturing the beauty of the underwater world.
 3")
Why Is White Balance Important in Underwater Photography?
Underwater photography presents unique challenges, particularly when it comes to capturing accurate colors. The water absorbs light differently than air, causing a significant shift in color perception as you descend. This phenomenon can lead to footage that appears overly blue or green, stripping away the vibrant hues of marine life and underwater landscapes. Therefore, understanding white balance is crucial for achieving stunning underwater images.
As you dive deeper, the color spectrum changes dramatically. Red light is absorbed quickly, followed by orange and yellow, leaving primarily blue and green wavelengths. This absorption results in a lack of warmth and vibrancy in your footage. Consequently, without proper adjustments, your videos may look dull and lifeless. To combat this, adjusting your camera’s white balance settings is essential.
White balance refers to the adjustment of colors to ensure that the white objects in your scene appear neutral, thus restoring the natural hues of your footage. By calibrating your camera to the specific lighting conditions underwater, you can effectively counteract the color distortion caused by water. This adjustment is critical for ensuring that colors remain true to life, making your underwater footage much more appealing.
Most action cameras offer various white balance presets, such as Auto, Sunny, Cloudy, and Underwater. For underwater filming, consider using the Underwater setting, which is designed to enhance reds and yellows that are lost in deeper water. If your camera allows, you can also manually adjust the white balance by selecting a specific color temperature, typically between 5000K to 6000K for underwater environments.
In addition to adjusting white balance, using filters can significantly improve your underwater footage. Red filters are particularly effective for deeper dives, as they help restore the red hues that are absorbed by the water. These filters work best when shooting at depths greater than 10 feet, where color loss is more pronounced. For shallower waters, a polarizing filter can help reduce glare and enhance overall clarity.
- Test Your Settings: Before diving, take sample shots at various depths to see how your settings affect color accuracy.
- Use Natural Light: Whenever possible, shoot during the day when sunlight can penetrate the water effectively.
- Post-Processing: Don’t hesitate to enhance colors in post-production using software like Adobe Premiere Pro or Final Cut Pro. Color correction tools can help fine-tune your footage.
Maintaining consistent white balance throughout your underwater shoot is vital for a cohesive look in your final video. Inconsistent color grading can distract viewers and detract from the overall quality of your footage. To achieve this, consider using the same white balance setting for the entirety of your shoot, adjusting only if lighting conditions change significantly.
In summary, understanding and adjusting white balance is key to capturing stunning underwater footage. By compensating for the color distortions caused by water and utilizing filters, you can create vibrant, lifelike videos that showcase the beauty of the underwater world. With practice and the right techniques, your underwater photography will not only improve but also convey the captivating essence of marine life.
 4")
What Accessories Enhance Underwater Filming?
When it comes to underwater filming, the right accessories can make a significant difference in the quality of your footage. Whether you’re a beginner or a seasoned videographer, understanding which tools to use is essential for capturing stunning underwater visuals. Here, we delve into the must-have accessories that will elevate your underwater filming experience.
Using the right accessories can elevate your underwater filming experience. Essential items include:
- Waterproof Housings
- Filters
- Lights
- Buoyancy Devices
- Tripods and Stabilizers
Waterproof Housings are crucial for protecting your camera from water damage. They should be rated for the depths you plan to explore and allow easy access to all camera functions. A high-quality housing will not only keep your camera safe but also provide clear visuals by minimizing distortion.
Filters are another essential accessory for underwater filming. They help correct color imbalances caused by the absorption of light in water. For deeper dives, red filters are particularly effective, as they enhance the reds and oranges that are lost at greater depths. On the other hand, polarizing filters can reduce glare and improve contrast, making your footage more vibrant.
Lights are vital in underwater environments where natural light is limited. Using powerful LED lights can help illuminate your subject and enhance color accuracy. When filming in deeper waters or murky conditions, lights can significantly improve visibility, allowing you to capture clear and colorful footage.
In addition to these, buoyancy devices are essential for maintaining stability while filming. They help you achieve a balanced setup, preventing your camera from sinking too deep or floating too high. This stability is crucial for capturing smooth, professional-looking footage.
Tripods and stabilizers are also recommended for underwater filming. These tools help reduce camera shake, which can be particularly pronounced in underwater conditions. A good stabilizer or tripod will allow you to capture steady shots, especially when filming stationary subjects or slow-moving scenes.
In summary, investing in the right accessories can transform your underwater filming experience. From waterproof housings to specialized filters and lighting solutions, each accessory plays a vital role in enhancing your footage. By equipping yourself with these tools, you’ll be better prepared to capture breathtaking underwater visuals that truly reflect the beauty of the aquatic world.
How to Choose the Right Waterproof Housing?
When it comes to underwater videography, selecting the right waterproof housing for your action camera is absolutely essential. A quality waterproof housing not only protects your camera from water damage but also enhances your filming experience by providing easy access to controls and ensuring optimal performance. Below are key factors to consider when choosing the right waterproof housing.
- Depth Rating: One of the first things to check is the depth rating of the waterproof housing. Ensure it is rated for the depths you plan to explore. Most housings come with a specified maximum depth, so choose one that exceeds your intended diving limits.
- Material: The material of the housing plays a significant role in its durability. Look for housings made from high-quality materials such as polycarbonate or aluminum. These materials are not only lightweight but also resistant to corrosion from saltwater.
- Control Accessibility: An ideal waterproof housing should allow for easy access to all camera controls. This feature is crucial for making adjustments while filming. Check if the housing has well-placed buttons and if it allows for easy access to the camera’s screen.
- Compatibility: Ensure that the housing is specifically designed for your camera model. A properly fitting housing will provide the best protection and functionality. Look for manufacturers that offer housing solutions tailored to your specific camera.
- Lens Port: The lens port of the housing should be clear and designed to minimize distortion. Some housings come with interchangeable lens ports, allowing you to switch between different lenses for varying underwater conditions.
- Additional Features: Some advanced housings come with features like built-in filters for color correction or external lighting options to enhance visibility. Consider these features if you plan to shoot in challenging lighting conditions.
In addition to these factors, it’s wise to read reviews and seek recommendations from fellow underwater videographers. This can provide insight into the reliability and performance of various housings. Investing in a quality waterproof housing is not just about protection; it significantly impacts the quality of your underwater footage.
Furthermore, remember to regularly check the seals and gaskets of your housing to ensure they remain intact. Even a small breach can lead to catastrophic damage to your camera. Proper maintenance and careful handling will extend the life of your waterproof housing, allowing you to capture stunning underwater adventures.
What Filters Should You Use for Underwater Filming?
When it comes to underwater filming, using the right filters can significantly enhance the quality of your footage. The underwater environment can distort colors due to the absorption of light by water, which varies with depth. This article will explore the types of filters that can help you achieve vibrant and true-to-life colors in your underwater videos.
Filters play a crucial role in correcting color imbalances that occur underwater. As you dive deeper, colors like red and orange are absorbed more quickly, leading to a blue-green tint in your footage. By using filters, you can compensate for this loss and restore the natural hues of marine life and underwater landscapes.
- Red Filters: Ideal for deeper dives, red filters help to bring back the warm colors that are lost as you descend. They are particularly useful when filming at depths greater than 10 feet, where red wavelengths are significantly diminished.
- Magenta Filters: These filters are effective for filming in greenish waters, such as those found in lakes or rivers. They help to enhance the reds and purples in your footage, making the colors appear more vibrant.
- Polarizing Filters: These filters are designed to reduce glare from the water’s surface, enhancing clarity and contrast in your images. They are particularly beneficial when shooting on sunny days, as they help to minimize reflections that can obscure your view.
When selecting a filter, consider the depth at which you will be filming and the water conditions. For example, if you are planning a dive in clear ocean waters, a red filter may be your best choice. Conversely, if you are in murky freshwater, a magenta filter could provide better results.
Ensure that the filters you choose are compatible with your action camera model. Many manufacturers offer specially designed filters that can be easily attached to your camera housing. Check the specifications and recommendations to find the best fit for your equipment.
- Experiment with Different Filters: Don’t hesitate to try out various filters during your dives. Each filter can produce different effects depending on the environment and lighting conditions.
- Adjust Your White Balance: Even with filters, it’s essential to adjust your camera’s white balance settings to further enhance color accuracy. This adjustment can complement the effect of the filter and result in more stunning footage.
- Use Filters in Combination: In some cases, using multiple filters can yield better results. For instance, combining a polarizing filter with a color correction filter can help you achieve both clarity and vibrant colors.
In summary, filters are an indispensable tool for anyone serious about underwater videography. By understanding the different types of filters available and how to use them effectively, you can significantly improve the quality of your underwater footage, making it more visually appealing and engaging. Whether you are capturing the vibrant colors of coral reefs or the serene beauty of underwater landscapes, the right filter can make all the difference.
 5")
How to Maintain Your Action Camera for Underwater Use?
Maintaining your action camera is crucial for ensuring its longevity, especially when it is frequently used in underwater environments. Regular maintenance not only helps preserve the camera’s functionality but also enhances the quality of your underwater footage. Below are essential tips and practices to keep your action camera in top condition.
Regular maintenance is essential for ensuring the longevity of your action camera. It helps to prevent damage from harsh conditions such as saltwater and sand, which can lead to corrosion and malfunction. Neglecting maintenance can result in costly repairs or the need for a replacement.
After each underwater adventure, it is vital to clean your camera thoroughly. Here’s how:
- Rinse with Fresh Water: Immediately after use, rinse your camera and housing with fresh water to remove salt and sand.
- Use a Soft Cloth: Gently wipe the camera and housing with a soft, lint-free cloth to prevent scratches.
- Check Seals and Lenses: Inspect seals for any sand or debris and clean the lens to ensure clear footage.
Proper storage is equally important for maintaining your action camera. Consider the following practices:
- Use a Protective Case: Store your camera in a padded case to prevent physical damage.
- Avoid Extreme Temperatures: Keep your camera in a cool, dry place to avoid overheating or moisture accumulation.
- Remove Batteries: If storing for an extended period, remove the batteries to prevent leaks and corrosion.
Establishing a regular maintenance schedule is beneficial. Here are some recommendations:
- After Every Use: Clean and inspect your camera after each underwater session.
- Monthly Checks: Conduct a more thorough inspection of seals, buttons, and functionality monthly, even if the camera hasn’t been used.
- Annual Professional Servicing: Consider sending your camera for professional servicing annually to ensure all components are functioning optimally.
Being vigilant about potential damage can save you from future issues. Watch for:
- Water Leakage: Any signs of moisture inside the housing indicate a compromised seal.
- Corrosion: Check for rust or corrosion, especially around the battery compartment and buttons.
- Malfunctions: If your camera is not functioning correctly, it may need professional attention.
Taking proactive steps can significantly extend the life of your action camera. Here are some effective strategies:
- Use a Screen Protector: Protect the lens and screen from scratches and damage.
- Limit Exposure to Harsh Conditions: Avoid using your camera in extreme conditions unless necessary.
- Regular Firmware Updates: Keep your camera’s firmware updated to ensure optimal performance and security.
By following these maintenance tips, you can ensure that your action camera remains in excellent condition, ready for your next underwater adventure. Regular cleaning, proper storage, and vigilance against potential damage are key to preserving the functionality and performance of your device.
 6")
What Techniques Improve Underwater Filming Quality?
When it comes to capturing stunning underwater footage, employing specific techniques is essential for achieving high-quality results. The underwater environment presents unique challenges, but with the right methods, you can significantly enhance your videography experience. Below, we explore various techniques that can improve the quality of your underwater filming.
Stabilization is crucial when filming underwater, as even slight movements can lead to shaky footage. One effective method is to use a gimbal or a floaty grip, which helps to absorb vibrations and maintain a steady shot. Additionally, consider using the in-camera stabilization features available on many action cameras. These features can help smooth out your footage, resulting in a more professional-looking video.
Shooting in natural light is one of the best ways to enhance your underwater footage. The clarity and vibrancy of colors can be significantly improved when you film during optimal lighting conditions. Midday is often the best time because sunlight penetrates the water more effectively, illuminating your subjects and reducing shadows. However, if you are diving deeper, consider using artificial lights to enhance visibility and bring out the colors that may be lost in deeper waters.
Maintaining a steady hand while filming underwater is vital for capturing clear images. Before you start filming, take a moment to stabilize your body. Position yourself against a rock or coral to minimize movement. If you find it challenging to keep your camera steady, practice using slow, deliberate movements. This technique not only helps reduce blur but also allows you to capture more detailed shots of marine life.
Composition plays a significant role in the quality of your underwater footage. Use the rule of thirds to create balanced and engaging shots. Position your subjects off-center to draw the viewer’s eye and create a sense of depth. Additionally, try to include interesting foreground elements, such as coral or plants, to enhance the visual appeal of your shots. Experimenting with different angles and perspectives can also yield stunning results.
Underwater filming can often lead to color distortion due to water absorption. Utilizing filters can help correct these imbalances. For example, a red filter is ideal for deeper dives, as it restores the warm colors that are lost underwater. On the other hand, a polarizing filter can reduce glare from the water’s surface, enhancing clarity and allowing for richer colors in your footage.
Proper planning is essential for a successful underwater shoot. Before diving, scout the location and familiarize yourself with the marine life and underwater topography. Create a shot list to ensure you capture all the essential moments. Additionally, consider the timing of your dive; certain marine animals are more active during specific times of the day, which can greatly enhance your footage.
By implementing these techniques, you can significantly improve the quality of your underwater filming. From stabilization methods to effective lighting and composition, each aspect plays a crucial role in creating captivating underwater videos. With practice and attention to detail, your underwater footage will not only be clearer but also more engaging for your audience.
How to Use Natural Light for Better Footage?
When it comes to underwater videography, utilizing natural light can significantly enhance the quality of your footage. The way sunlight interacts with water creates a unique environment that can either make or break your video. Understanding how to harness this natural resource effectively is crucial for capturing stunning visuals.
Underwater environments can often distort colors due to the absorption of light by water. As you descend, colors like red and orange fade quickly, leaving blues and greens to dominate the scene. By filming in natural light, especially during peak sunlight hours, you can enhance color vibrancy and visibility. This not only makes your footage more appealing but also helps in maintaining the natural hues of the underwater world.
The ideal time for underwater filming is during the mid-day hours when the sun is at its highest point in the sky. This timing allows sunlight to penetrate the water more effectively, illuminating your surroundings and creating stunning visuals. The angle of the sunlight during these hours minimizes shadows and enhances the overall clarity of your footage.
To maximize the benefits of natural light, consider your camera’s angle and position. Aim to shoot with the sun behind you, allowing the light to illuminate your subject. This technique not only enhances visibility but also reduces glare and reflections that can distort your footage. Experimenting with different angles can yield surprising results, so don’t hesitate to try various positions.
The depth of water plays a significant role in how natural light is perceived in your footage. As you dive deeper, the amount of light diminishes, and colors start to wash out. To combat this, try to stay within shallower depths, especially when shooting vibrant marine life or coral reefs. If you must film at greater depths, consider using color correction filters to restore the natural hues lost due to light absorption.
While natural light is a fantastic resource, certain accessories can enhance its effects. For example, using a polarizing filter can help reduce surface glare, allowing for clearer shots. Additionally, underwater lights can supplement natural light, especially during early morning or late afternoon when sunlight is less intense. These tools can help illuminate your subjects and provide a more comprehensive view of the underwater landscape.
- Shoot in RAW: This format retains more data, allowing for better color correction during editing.
- Adjust White Balance: Setting the correct white balance can counteract color shifts caused by water.
- Use a Wide-Angle Lens: This can help capture more light and provide a broader view of your surroundings.
In conclusion, effectively using natural light for underwater videography requires understanding its properties and how to manipulate them to your advantage. By filming at the right times, positioning your camera thoughtfully, and utilizing accessories wisely, you can dramatically improve the quality of your underwater footage. Embrace the beauty of natural light, and your videos will reflect the vibrant underwater world in all its glory.
What Are the Best Practices for Stabilizing Your Camera?
When it comes to filming underwater, achieving steady and smooth footage is essential for capturing the beauty of the aquatic world. Utilizing effective stabilization techniques can make a significant difference in the quality of your videos. Below are some of the best practices to ensure your underwater filming is as stable as possible.
Underwater filming presents unique challenges, such as water currents and movement from the diver. These factors can lead to shaky footage, which detracts from the overall viewing experience. By implementing stabilization techniques, you can enhance the professionalism of your videos and provide a more immersive experience for your audience.
- Using a Gimbal: A gimbal is a device that stabilizes your camera by using motors to counteract any unwanted movements. This tool is particularly useful for dynamic shots, allowing for smooth transitions and fluid motion.
- Floaty Grips: A floaty grip not only keeps your camera buoyant but also provides a stable handle. This is especially helpful for handheld shooting, as it allows for better control and reduces the chances of shaky footage.
- Tripods and Monopods: For stationary shots, using a tripod or monopod can provide stability. Ensure that the tripod is designed for underwater use to prevent corrosion and maintain durability.
- Body Stabilizers: Some divers use body-mounted stabilizers that attach to the chest or waist. These devices help absorb movement from swimming, resulting in smoother footage.
In addition to using stabilization equipment, employing proper filming techniques is crucial. Here are some tips to enhance stability:
- Maintain a Steady Hand: Keep your hands steady while filming. Try to use both hands to grip the camera firmly, which can help minimize shakes.
- Slow Movements: When panning or tilting, do so slowly and smoothly. Rapid movements can exacerbate shakiness and make the footage look unprofessional.
- Use Natural Support: Utilize the underwater environment for support. Lean against rocks or coral formations to stabilize your body while filming.
Adjusting your camera settings can also assist in achieving smoother footage. Consider the following:
- Frame Rate: Opt for a higher frame rate, such as 60fps, to capture fast-moving subjects more smoothly. This can help reduce the appearance of motion blur.
- Resolution: Shooting at a higher resolution allows for more detail, which can be beneficial when stabilizing footage in post-production.
Even with the best stabilization techniques, some footage may still require post-editing adjustments. Use video editing software to apply stabilization effects, which can help smooth out any remaining shakes. Programs like Adobe Premiere Pro offer built-in stabilization features that can significantly enhance your final product.
In conclusion, employing a combination of effective stabilization techniques, proper filming practices, and thoughtful editing can dramatically improve the quality of your underwater footage. By focusing on these aspects, you can create stunning videos that showcase the beauty of the underwater world with clarity and professionalism.
 7")
How to Edit Your Underwater Footage Effectively?
Editing your underwater footage is an essential step in the production process, as it allows you to transform raw clips into visually stunning videos that capture the beauty of the underwater world. With the right tools and techniques, you can significantly enhance the quality of your videos, making them more engaging and enjoyable for your audience.
Editing is not just about cutting and splicing clips together; it’s a crucial process that involves refining your footage to achieve the best possible outcome. Underwater environments can pose unique challenges, such as color distortion and lighting issues. Effective editing helps to address these challenges, allowing you to present your footage in its best light.
There are several powerful software options available for editing underwater videos. Two of the most popular choices are Adobe Premiere Pro and Final Cut Pro. Both programs offer a range of features that can help you enhance your video quality:
- Color Correction: Adjust the color balance to counteract the blue and green hues typically found in underwater footage.
- Trimming and Cutting: Remove unnecessary sections to create a more dynamic and engaging narrative.
- Adding Effects: Incorporate transitions, text overlays, and visual effects to enhance storytelling.
Color correction is vital for restoring the natural colors of your underwater footage. The following steps can help:
1. Import your footage into your editing software.2. Use the color grading tools to adjust the white balance.3. Increase saturation and contrast to make colors pop.4. Apply color filters, such as red filters, to counteract blue tones.
Trimming is essential for maintaining viewer interest. Here are some best practices:
- Keep Clips Short: Aim for concise clips that highlight the best moments.
- Maintain a Narrative: Ensure your edits contribute to the overall story you want to tell.
- Use B-Roll: Incorporate secondary footage to add depth and context to your main shots.
Adding effects and transitions can make your video more visually appealing. Consider the following:
- Use Simple Transitions: Avoid overly complex transitions that can distract from the footage.
- Incorporate Slow Motion: Slow-motion effects can emphasize action and create a dramatic effect.
- Text Overlays: Use text to provide context or information about the underwater environment or species featured.
Once you’ve completed the editing process, it’s time to export your video. Follow these steps:
1. Choose the appropriate resolution (4K or 1080p).2. Select the right format (MP4 is widely used).3. Adjust the bitrate for optimal quality and file size.4. Save and export your video.
By following these editing techniques and utilizing the right software, you can transform your underwater footage into captivating videos that resonate with your audience. Remember, effective editing not only enhances the visual appeal but also tells a compelling story that brings the underwater world to life.
Frequently Asked Questions
- What are the best action cameras for underwater filming?
Some top contenders include the GoPro HERO series and DJI Osmo Action. These cameras are renowned for their durability and waterproof capabilities, making them perfect for underwater adventures.
- How do I set up my action camera for underwater filming?
To capture stunning underwater footage, adjust settings like resolution, frame rate, and white balance. These tweaks can significantly enhance your video quality, so don’t skip them!
- Why is white balance important in underwater photography?
Underwater environments can distort colors, making your footage look off. Adjusting the white balance helps restore natural hues, ensuring your videos are vibrant and true to life.
- What accessories enhance underwater filming?
Consider using waterproof housings, filters, and lights to improve visibility and color accuracy. These accessories can elevate your filming experience and help you capture stunning visuals.
- How can I maintain my action camera for underwater use?
Regular maintenance is key! Proper cleaning and storage are essential to prevent damage from saltwater and sand. Treat your camera well, and it will reward you with amazing footage.